Get your vario in time for Christmas: order now before Thursday 12 December 12:00
Menu
BipBip PRO V 1&2: detailed user guide
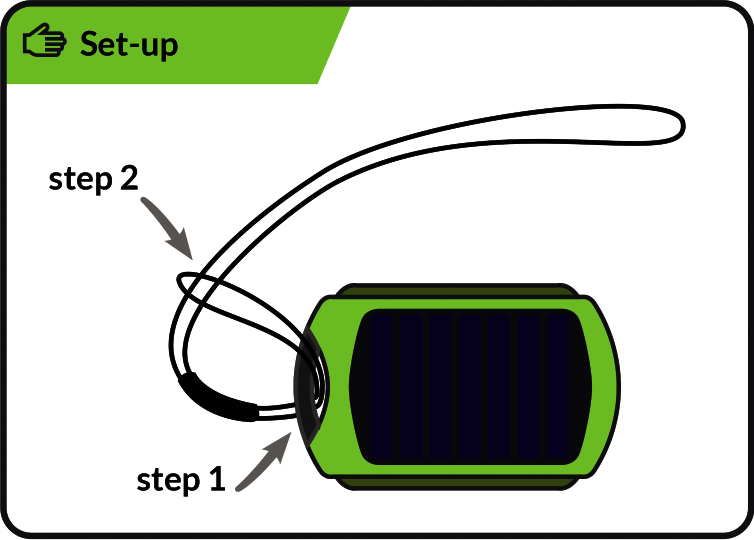
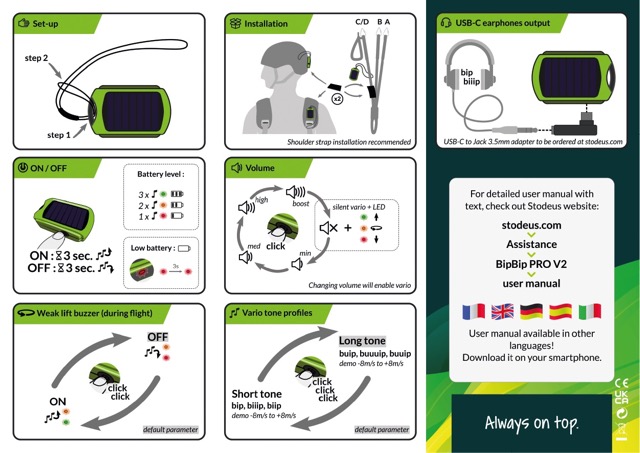
Set-up: Make a lark's head with the attachment line to secure the BipBip PRO V2.
Pass the small loop of the tether line through the handle of the BipBip PRO V2.
Pass the other end of the line (large loop) inside the small loop.
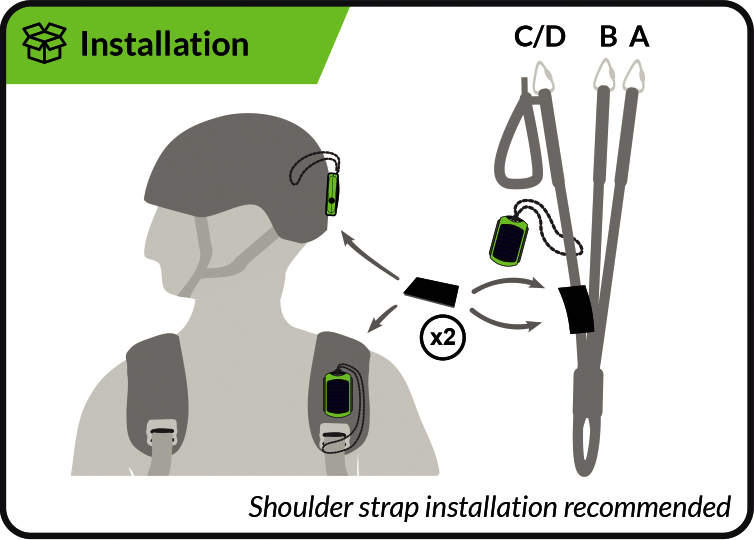
Installation: 2 Velcro loops are supplied with the BipBip PRO V2 to attach it to your equipment. You can stick one Velcro strap to the back of your helmet, and if necessary, stick the second to the shoulder strap of your harness. If you need to see the BipBip PRO V2's LED, you can place it directly on your cockpit, or use the two Velcro loops glued together around the riser.
Note: Installation on the harness shoulder strap is recommended. On the helmet, make sure you always place the BipBip PRO V2 on the back of the helmet, not on the side, to avoid inconsistent beeps due to variations in the relative wind (for example when the rider turns his head).
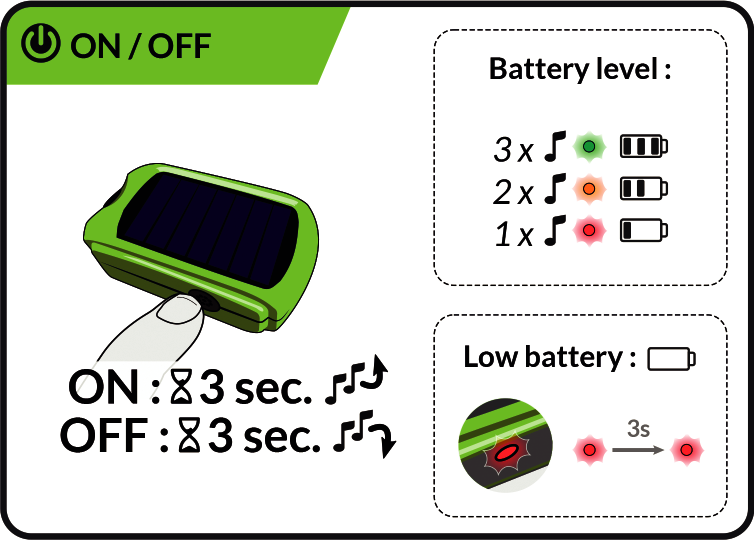
ON : To switch on your BipBip PRO V2, press and hold the button for 3 seconds. You'll hear the start-up melody, followed by the battery level.
3 beeps + green LED: battery 100%.
2 beeps + orange LED: 50% battery.
1 beep + red LED: battery 10%.
OFF : To switch off your BipBip PRO V2, hold down the button for 3 seconds and you will hear the switch-off melody.
Note: If the LED flashes red every 3 seconds, the battery is empty and the BipBip PRO needs recharging.
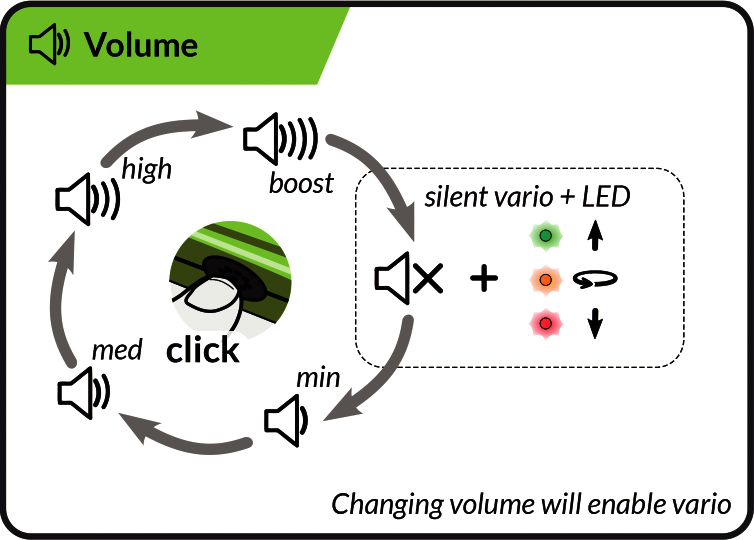
Volume: You can select from five different volumes at the click of a button:
minimum
medium
high
boost
silent vario + LED (green: up, orange: zero, red: down)
Note: On the ground, changing the volume will activate the vario, which by default is silent until you take off (configurable, see the "descent alarm" section).
Zerotage : brief modulations indicating an area of very weak lift, not strong enough to roll but potentially close to a thermal (vario from -30cm/s to the selected climb rate, default +15 cm/s).
To enable or disable this option, double-click the button at any time when the instrument is switched on.
Note: You can also have zeroing always activated at start-up, see the "lowering alarm" section.
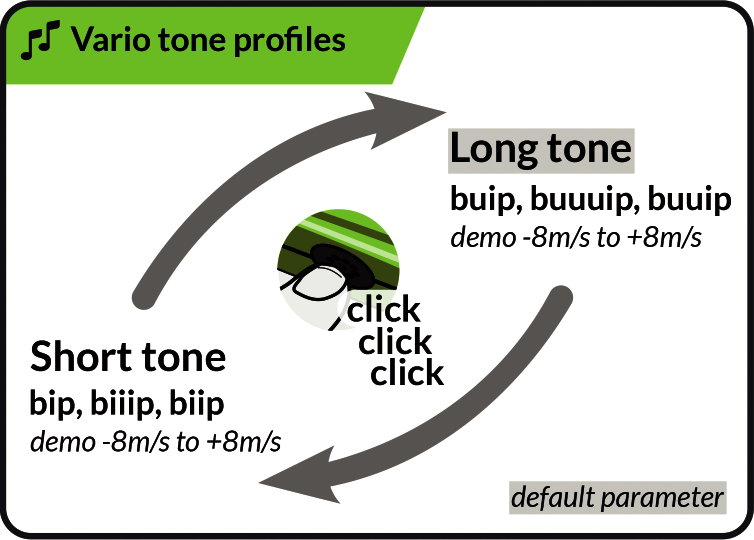
Vario profiles Select the audio profile that suits you best.
long, progressive beeps for precise rate-of-climb information.
Short, constant beeps for simple, effective ascendancy information.
To switch from one profile to another, triple-click the button at any time when the instrument is switched on. You'll then hear a short demo of the profile on a simulated vario ranging from -8m/s to +8m/s.
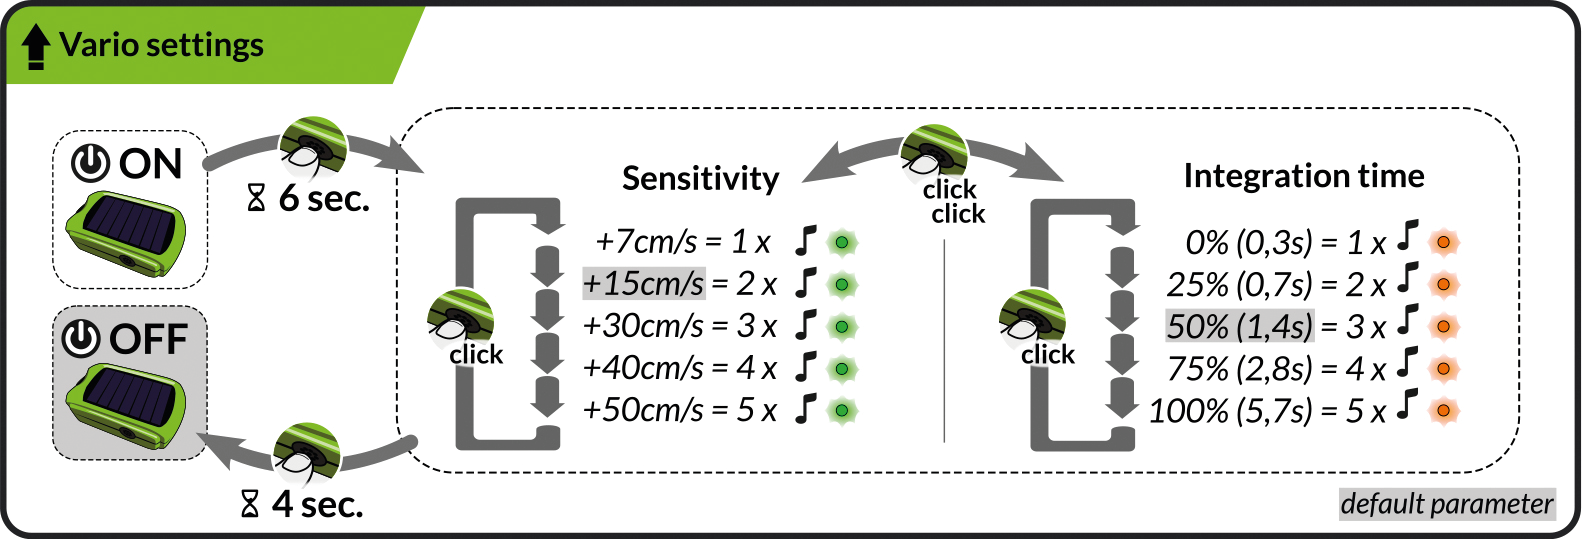
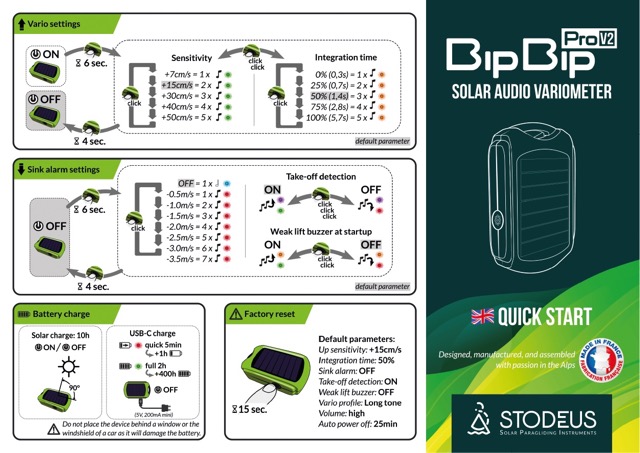
Vario settings: You can change the climb rate setting at any time, even just before take-off, by following the diagram above.
To enter the vario settings menu :
BipBip PRO V2 must be on.
Then press and hold the button for at least 6 seconds.
Then, each click changes the setting.
When you have chosen your climb rate sensitivity, double-click to move on to the integration time setting.
Each click changes the setting.
Confirm your choice by pressing and holding the button for 4 seconds.
Note: A slow integration time gives a damped and averaged vario, for a better understanding of the information. Ideal for weak lift with a wide turn radius.
A very short integration time gives almost instantaneous, fast vario. Ideal for leeward, choppy thermals that are difficult to exploit.
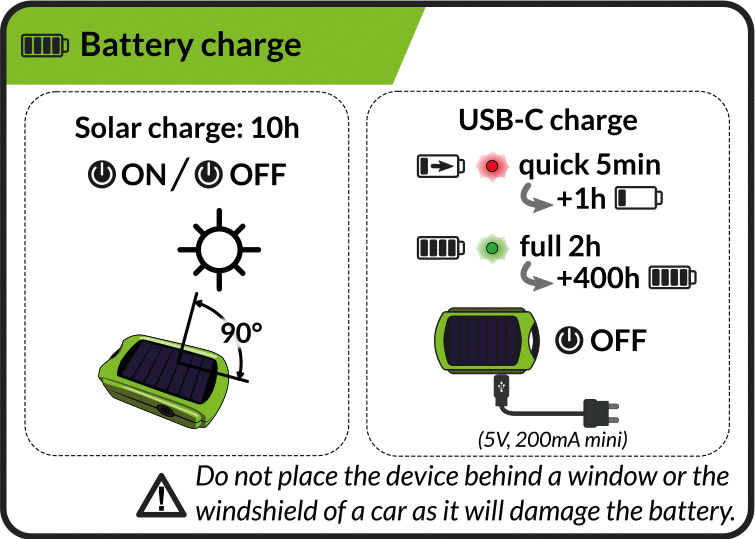
Charge : The BipBip PRO V2 charges continuously when it's in the sun! Allow around 10h ofdirect sunlight to fully charge it.
When the battery level is low (10%), the LED flashes red. This indicates that you need to recharge the BipBip PRO V2, either by leaving it in the sun or by charging it via USB.
To recharge via USB, it must be switched off. The LED glows red, then turns solid green when charging is complete. When the BipBip PRO V2 is charging using solar power, the LED shows nothing.
Note: Be careful not to leave the BipBip PRO V2 behind a window or the windscreen of your car, as this will not charge your BipBip PRO V2 and will damage the battery.
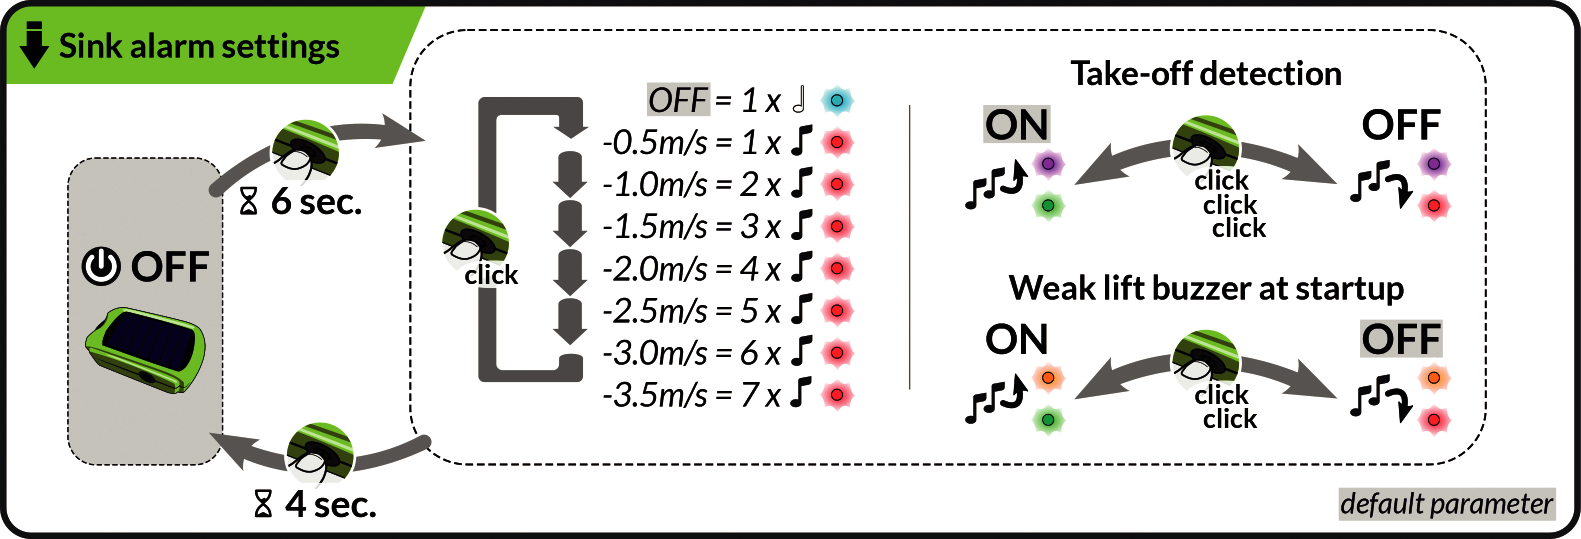
Setting the descent alarm : You can change the descent alarm setting at any time, even just before take-off, by following the diagram above.
To enter the sink alarm setting menu :
BipBip PRO V2 must be off.
Then press and hold the button for at least 6 seconds.
Then, each click changes the setting.
If you wish, you can activate or deactivate the take-off detection by triple-clicking.
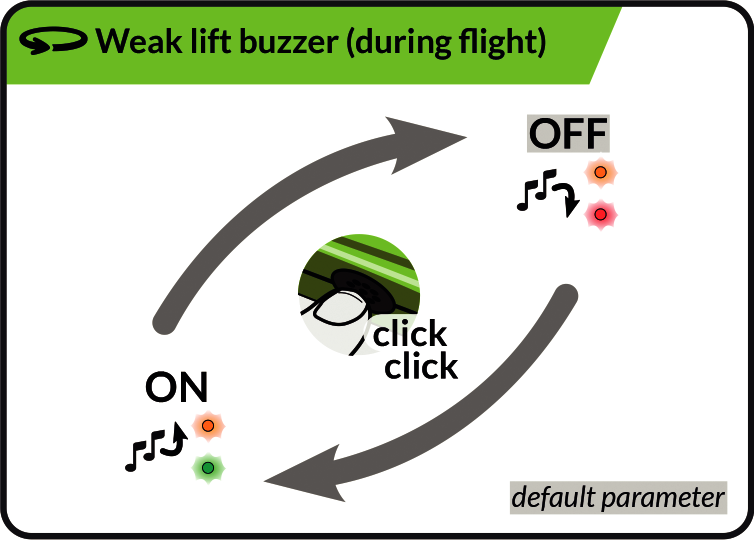
If you wish, you can activate or deactivate the weak-lift buzzer at start-up by double-clicking.
Confirm your choice by pressing and holding the button for 4 seconds.
Reset : If you need to, you can perform a factory reset at any time by pressing and holding the button for around 15 seconds: the default settings will be restored.
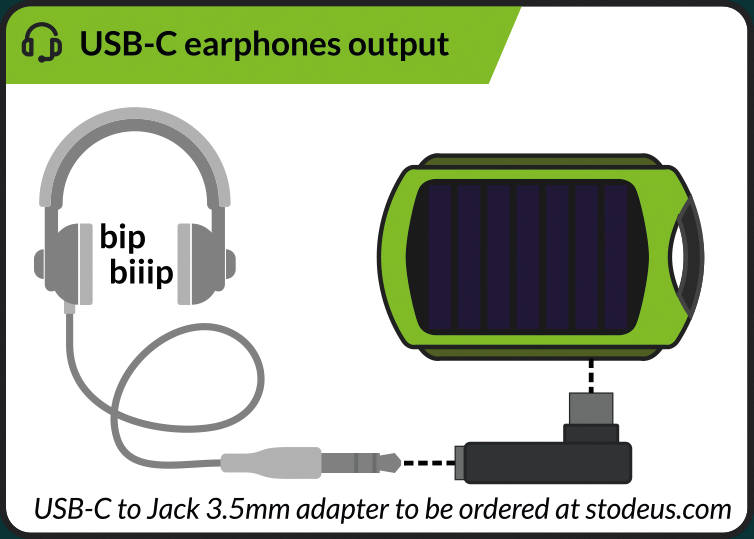
Headphones output: If you wish to connect headphones or earphones to receive the beeps directly into your ears, you must use theStodeus USB-C to 3.5mm jack adapter.