BlueBip: detailed instructions & FAQ

Montage : Make a lark's head with the attachment line to secure the BlueBip.

  1. Pass the small loop of the attachment line through the handle of the BlueBip.
  2. Pass the other end of the line (large loop) inside the small loop.

Installation: Installation on the harness shoulder strap or on the cockpit is recommended.

2 Velcro loops are supplied with the BlueBip to attach it to your equipment.
You can attach one Velcro strap to your harness, and if necessary, attach the second to the back of your helmet.
If you need to see the BlueBip LED, you can place it directly on your cockpit, or use the two Velcro loops glued together around the riser.

ON : To switch on your BlueBip, press and hold the button for 3 seconds. You'll hear the start-up melody, followed by the battery level.

  • 3 beeps + green LED: battery 100%.
  • 2 beeps + orange LED: 50% battery.
  • 1 beep + red LED: battery 10%.


OFF : To switch off your BlueBip, hold down the button for 3 seconds and you'll hear the switch-off melody.

Note: If the LED flashes red every 3 seconds, the battery is empty and the BlueBip needs recharging.

Volume : You can select from five different volumes at the click of a button, at any time.

Silent Vario : LED behaviour can be configured in the Configurator.

The vario is silent on the ground. On the ground, changing the volume will activate the vario, which is silent by default until you take off (configurable, see the "descent alarm" section).

Note: The volume of the vario consumes energy: when it is at maximum, battery consumption is high.

Climb beep settings : You can change the climb sensitivity without using the Configurator (just before take-off, for example), following the diagram above.

To enter the vario settings menu :

  1. The BlueBip must be lit.
  2. Then press and hold the button for at least 6 seconds.
  3. Then, each click changes the setting.
  4. When you have chosen your rise sensitivity, double-click to move on to the integration time setting.
  5. Each click changes the setting.
  6. Confirm your choice by pressing and holding the button for 4 seconds.


Note: A slow integration time gives a damped and averaged vario, for a better understanding of the information. Ideal for weak lift with a wide turn radius.
A very short integration time gives instant, fast vario. Ideal for leeward, choppy thermals that are difficult to exploit.

Setting the descent alarm : You can change the descent alarm without going through the Configurator (just before take-off, for example), following the diagram above.

To enter the lowering alarm setting menu :

  1. The BlueBip must be off.
  2. Then press and hold the button for at least 6 seconds.
  3. Then, each click changes the setting.
  4. If you wish, you can activate or deactivate take-off detection by triple-clicking.
  5. If you wish, you can activate or deactivate zeroing at start-up by double-clicking.
  6. Confirm your choice by pressing and holding the button for 4 seconds.

Bluetooth connectivity : The BlueBip connects via Bluetooth to your favourite flight application on Android and iPhone (XCTrack, FlySkyHy, FlyMe, SeeYou Navigator, LK8000, and more).

The Bluetooth device name is "BlueBip🪂XXXX" (XXXX being the device serial number).
This name can be customised simply by entering the driver name in the Configurator.

To establish a connection between the BlueBip and your flight app, there is no need to pair the BlueBip with your smartphone in the Bluetooth menu. (except for remote control mode).

Click here for Bluetooth connectivity guides by flight app.

Note: For electrosensitive people, it is possible to completely deactivate Bluetooth via the Configurator.

Zeroing : brief modulations indicating an area of very weak lift, not strong enough to roll but potentially close to a thermal (vario from -50cm/s to the selected climb rate, default +15 cm/s).
Configurable thresholds in the Configurator.

To enable or disable this option, double-click the button at any time when the instrument is switched on.

Note: It is also possible to have zeroing activated from start-up, see section "lowering alarm settings".

Configuration web-app : No need to install any software. Works on Windows, Linux, Mac, Android with a web browser, even offline.

Use Chrome or Firefox. More information on the Configurator.

Charge : In-flight solar charging is guaranteed with the default settings (minimum or average volume, default vario settings, descent and zeroing alarms deactivated, etc.).

The BlueBip's autonomy obviously depends on the amount of sunlight available, as well as the options activated in the Configurator (see consumption indication for each parameter).

Note: If the battery is completely empty, when the BlueBip is switched on, it will emit a beep, then the shutdown melody, and the LED will flash red for a few seconds.

You can either connect the device to your computer as a USB stick, or charge it using your smartphone's mains charger (or cigarette lighter, external battery, etc). Any power source of any strength (from 200mA to 4A) can be used.

Note: The device has a standard USB connector (USB-C) and can be charged using any cable. You can use any USB charger, standard 5V or Quick Charge (QC), Power Delivery (USB-C PD) as the device is fully USB compliant.
When charging via USB, the device will draw a maximum of 200mA. Charging is complete in 2 hours.

When charging via USB, the charge level is indicated by the BlueBip LED (when switched off):

  • When it is charging, the LED flashes slowly red.
  • When charging is complete, the LED lights up steady green, and after an hour it goes out completely.

The BlueBip always charges when it's in the sun (whether it's switched off or on)! Solar charging is not signalled to save battery power. Allow around 20 hours of direct sunlight to charge it up to 70%.

Note: Solar charging works best in direct sunlight (not overcast or cloudy). Be careful not to leave the BlueBip behind a window or the windscreen of your car, as this will not charge your BlueBip and will damage the battery.

Headphone output : If you wish to connect headphones or earphones to receive the beeps directly into your ears, you must use theStodeus USB-C to 3.5mm jack adapter.

The headphones must have a 3.5mm jack connector.

Note: This audio functionality is only guaranteed with thecustom-made Stodeus adapter.

Perform a factory reset at any time : the default settings will be applied.

Note: your last configuration file will be saved as before-reset-config.bluebip.

Default settings :

  • Instant Vario: ON
    • climb threshold: 10cm/s
    • integration time: 50%
    • DOWN ALARM : OFF
    • zeroing: OFF
    • vario silent floor: ON
  • Bluetooth connectivity: ON
  • Automatic switch-off: after 30 minutes of inactivity

Download the printable version of the instructions for use here

pdf
Download page 1
pdf
Download page 2

BlueBip : FAQ

Bluetooth connectivity :

In order to establish the connection between the BlueBip and your flight app, there is no need to pair the BlueBip with your smartphone in the Bluetooth menu. (except for remote control mode).

Click here for Bluetooth connectivity guides by flight app.

Yes! the BlueBip can be connected via Bluetooth to Android and iOS smartphones and tablets!

Data transfer to the in-flight app cannot be done via USB, as Bluetooth is more energy-efficient. What's more, Bluetooth offers a more reliable connection than using a physical connection that could deteriorate. This method also leaves the phone's USB port free for a powerbank.

Start-up :

All you have to do is charge it on the mains (not on a powerbank, not on a computer) overnight with a charger and a cable that you know works (try charging your smartphone first). It is normal for the LED not to light up.

Configuration :

No! There's no need for software!
To configure BlueBip, there's the web-app Configuratorwhich is available here and also on the device. It's a simple web page that also works offline.
 

BlueBip can be connected to any Windows, Linux or Mac computer.

The BlueBip must not by no means be formatted.

Updates :

When you plug the BlueBip into your computer, it appears as a USB stick in your file explorer or finder.

Its root tree should look like this:
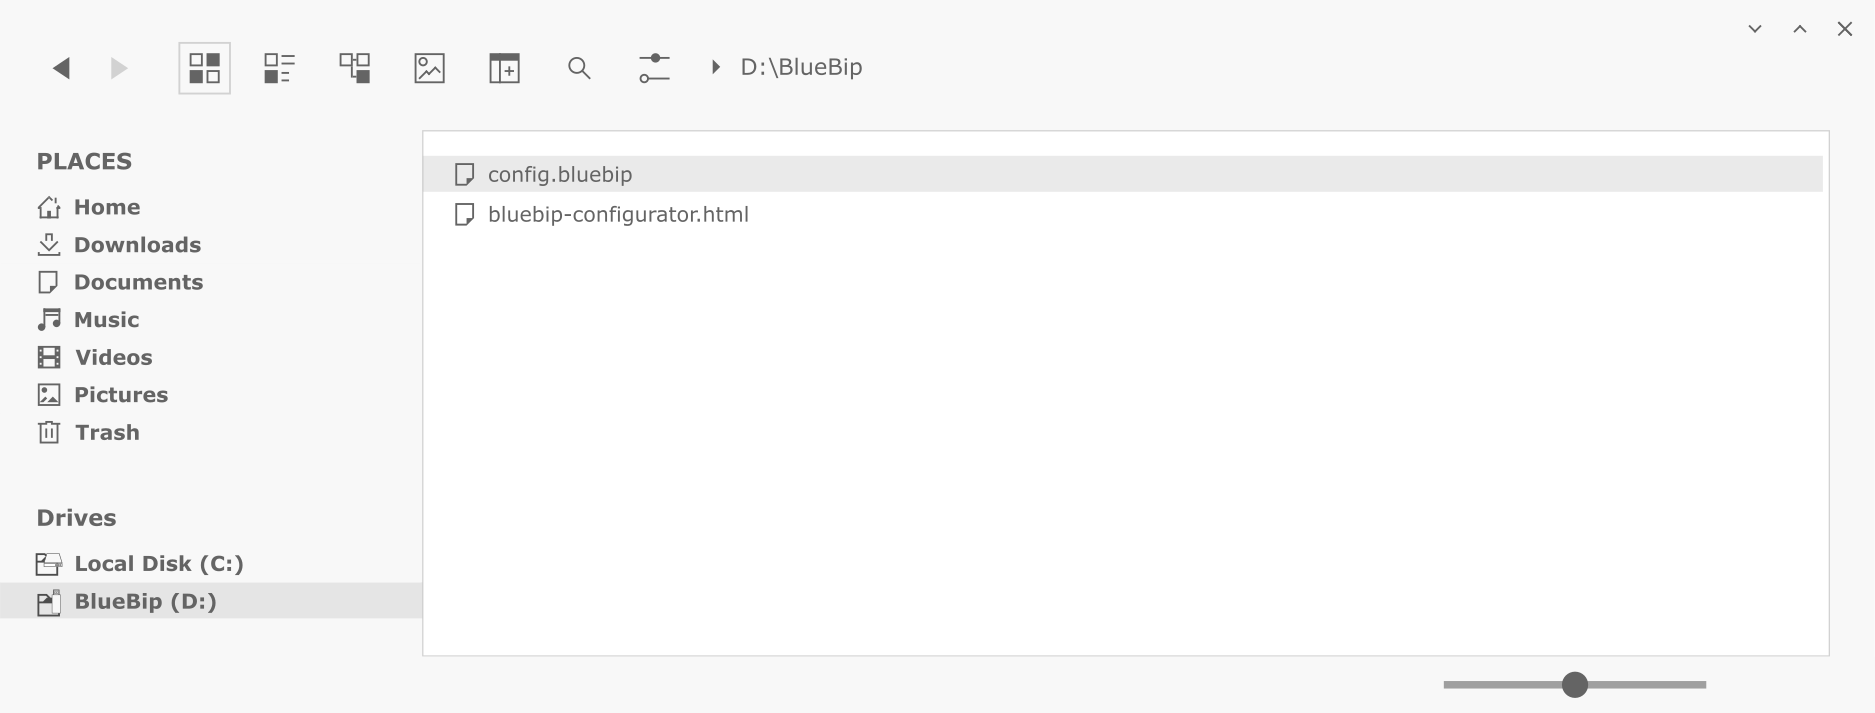
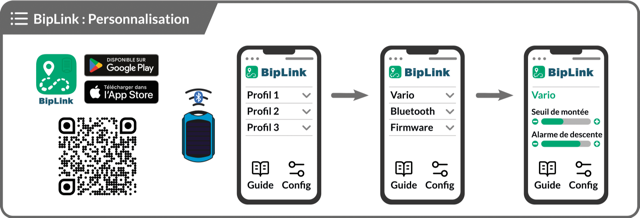
 
Only the "config.bluebip" file can be deleted, which is equivalent to performing a reset (press the button for 20s).
 
  1. Switching off the appliance
  2. USB connection to a computer
  3. Open the Configurator
  4. Click on "Load config", and follow the instructions
  5. The version number will be visible under System > Advanced


You may need to clear your browser's cache.


Vario :

The vario is silent on the ground by default: you must take off to activate the vario (variation of more than 1.5m/s).
(alternatively, changing the volume will also activate this function)

When the battery is very low, the volume is reduced to consume as little energy as possible and keep the BlueBip working as long as possible.

In flight, the BlueBip recharges itself via its solar cell, and when the battery level rises, so does the volume.

It's not a bug, it's a feature: zeroing!

This sound is made up of short modulations indicating weak lift (from -30cm/s to your climb rate setting, default +15cm/s), not strong enough to roll up, but which will help you find the nearest thermal.

To activate or deactivate it, simply double-click on the button.

Charge :

Yes, any source of any power (from 200mA to 4A) can be used: computer, smartphone charger, cigarette lighter, external battery (of any capacity).

Stodeus instruments have a standard USB connector and can be charged using any cable. You can use any USB charger, standard 5V or Quick Charge (QC), Power Delivery (USB-C PD) as the instruments are fully USB compliant.