leGPSBip+: demo video and configuration

leGPSBip+ : instructions for use

GPS search : The more the orange LED flashes, the more satellites are in view. When the GPS fix is established, the LED stops flashing.

As the leGPSBip+ is a very low-consumption, solar-powered device, it needs optimum conditions to make a GPS fix in less than 2 minutes: at the launch site, in a well-cleared area with a clear sky, with the handle pointing skywards and at a minimum height of 1.50m above the ground (ideally on the helmet over the pilot's head).

The GPS fix takes much longer if you're on the move. Once the fix has been made once when stationary, it will keep it when you're on the move. Ideally, you should switch on leGPSBip+ once you've arrived at your pre-flight location.

It can take up to 10 minutes for the very first GPS fix (variable depending on cloud cover).

Notes :
Without a GPS fix, your track will not be recorded.
During satellite acquisition, battery consumption is high.

GPS antenna position : To get the best satellite reception, position the device so that it faces the sky, as shown in the diagram.

Notes :
Even during your preparation, make sure that nothing is covering leGPSBip+, and that the antenna is correctly positioned towards the sky.
Track recording starts 1 minute before take-off detection (if the GPS fix has taken place). Or, in the ConfiguratorYou can disable take-off detection, and recording will start as soon as the GPS fix is established, and will continue as long as the camera is switched on.

Info: leGPSBip+ has been designed specifically for use in paragliding. We do not guarantee optimal operation in the car, at home or near buildings.

You can select four different volumes.

Silent Vario : Voice volume and LED behaviour can be configured in the Configurator.

Note:
The volume of the vario consumes energy: when it is at maximum, battery consumption is high.

You can change the climb sensitivity without using the Configurator (just before take-off, for example), by following the diagram above.

Note: if you have several profiles, you will need to select one first.

You can change the descent alarm without using the Configurator (just before take-off, for example), by following the diagram above.

Note: if you have several profiles, you will need to select one first.

Zeroing : short modulations will indicate that you are zeroing. Thresholds configurable in the Configurator.

Note: When the vario is silent or deactivated, the manual voice announcement is activated by double-clicking.

Request flight information at any time, by double-tap or double-click (if vario silent or deactivated) on the aircraft.

Note: The strength of the double-tap, the deactivation of the ground double-tap, and the format of the announcement can be configured in the Configurator.

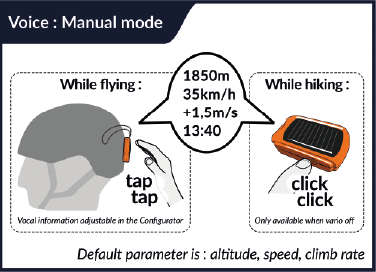
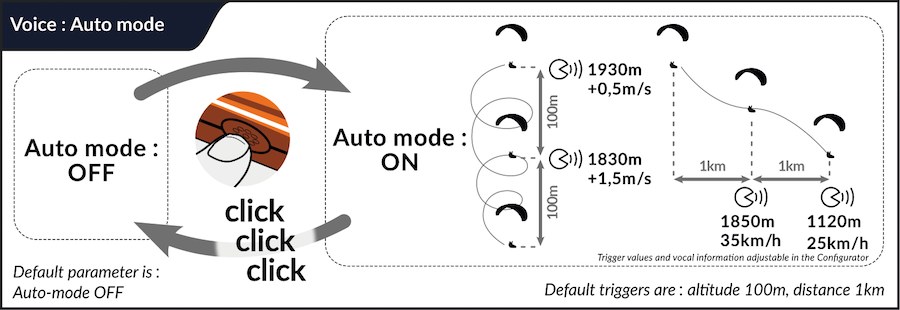
You can activate or deactivate automatic voice mode: announces flight information when distance, altitude or time conditions are met.

Flight voice information :

  • GPS ground speed (if available)
  • Altitude (ASL), calibrated from GPS on ignition, barometric during flight

Use Chrome or Firefox. More information on the Configurator.

To view a flight Retrieve the corresponding IGC file (in the tracks folder) and load it onto an online viewer such as IGC Webview, VisuGPS, CFD or XContest.
You can also load the KML file into Google Earth to view your route in 3D.

Each time it is switched on, the voice announces the approximate charge percentage of the GPSBip+. The percentage is announced in increments of 10, and each time it is switched on to check the percentage of charge, a few percent of the battery is consumed.

Note: the autonomy of the GPSBip+ obviously depends on the amount of sunlight available, as well as the options activated in the Configurator (see consumption indication for each parameter).

In-flight solar charging is guaranteed with the default settings (minimum or medium volume, 0.1Hz GPS frequency, default vario settings, auto voice and connectivity off, etc.).

If the battery is completely discharged, when the leGPSBip+ is switched on it will emit a beep, then the shutdown melody, and the LED will flash red for a few seconds.

You can either connect the device to your computer as a USB stick, or charge it using your smartphone's mains charger (or cigarette lighter, external battery, etc). Any power source of any strength (from 200mA to 4A) can be used.

Note: The device has a standard USB connector (USB-C) and can be charged using any cable. You can use any USB charger, standard 5V or Quick Charge (QC), Power Delivery (USB-C PD) as the device is fully USB compliant.
When charging via USB, the device will draw a maximum of 200mA. Charging is complete in 2 hours.

When charging via USB, the charge level is indicated by the LED on the GPSBip+ (when it is switched off):

  • When it is charging, the LED flashes slowly red.
  • When charging is complete, the LED lights up steady green, and after an hour it goes out completely.

The UltraBip always charges when it's in the sun (whether it's switched off or on)! Solar charging is not signalled to save battery power. Allow around 20 hours of direct sunlight to charge it up to 70%.

Note: Solar charging works best in direct sunlight (not overcast or cloudy). Be careful not to leave the GPSBip+ behind a window or the windscreen of your car, as this will not charge your GPSBip+ and will damage the battery.

See the connectivity guide here.
You can activate several profiles in the Configurator. If you have more than one profile, you will always be asked to choose your profile when you switch on.

Perform a factory reset at any time : the default settings will be applied, and you will have to choose your language again.

Note: your last configuration file will be saved as before-reset-config.gpsbip.

Languages : other languages can be downloaded here.

Default settings :

  • 1 profile
  • Manual mode voice: ON
    • announcement: altitude, speed, average rate of climb
  • Voice automatic mode: OFF
  • GPS: ON
    • take-off detection: ON
    • GPS frequency: 0.2 Hz
    • Recording format: IGC and KML
  • Instant Vario: ON
    • climb threshold: 20cm/s
    • DOWN ALARM : OFF
    • zeroing: OFF
    • vario silent floor: ON
  • Connectivity : OFF
  • Automatic switch-off: after 25min of inactivity

Download the printable version of the instructions for use here

Download page 1

Download page 2

leGPSBip+ : FAQ

Start-up :

You just need to charge it on the mains (not on a powerbank, not on a computer) for 1 hour with a charger and a cable that you know works (try charging your smartphone first). At this stage, 1 hour's charging is enough, leaving it overnight will have no effect, and it's normal for the LED not to light up.

After 1 hour, leaving it plugged in, perform a reset (press the button for around 20 seconds), then leave it to charge overnight.

If the connected reset has no effect, carry out a reset after unplugging it, then leave it to charge overnight.

The LED will light up green when the device is fully charged, then the LED will go out.

Configuration :

No! There's no need for software!
When leGPSBip+ is connected to a computer, it behaves like a USB stick, and its folders/files can be accessed via the file explorer. Tracks (IGC and KML files) are saved in the folder named "tracks".
 
To configure leGPSBip+, there is the web-app leConfigurator, which is available here and also on the device. It's a simple web page that also works offline.
 
Tracks are, by default, sorted by date in sub-folders as follows (they can also be sorted flat to facilitate export to flight management software):
 

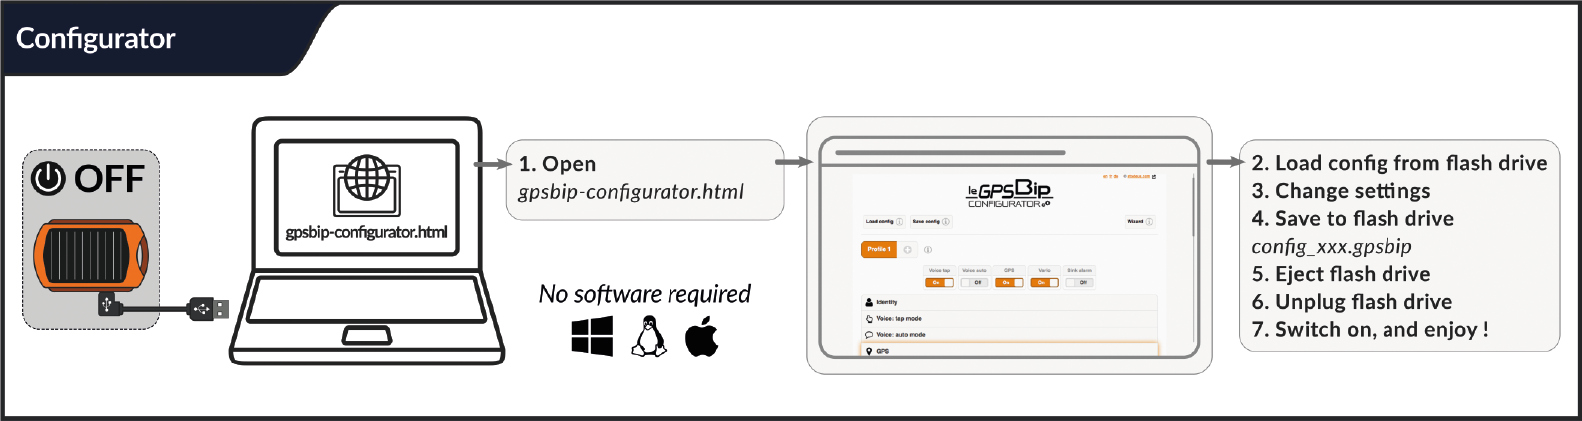
leGPSBip+ can be connected to any Windows, Linux or Mac computer.

leGPSBip+ must not by no means be formatted, at the risk of invalidating the manufacturer's warranty.

Updates :

This means that you need to calibrate the sensors in order to benefit from Instant Vario.

Thank you for follow the procedure described here.

This does not apply to leGPSBip+, the sensors are calibrated at the factory, and Instant Vario is activated by default.

It is not possible to force a new calibration. In fact, there is no need to do it again (even after an update or reset). Once it has been done the first time, if it has been validated (voice confirmation), then the sensors are correctly and definitively calibrated. If they had not been correctly calibrated, then the calibration would have failed and the process would have been restarted until the calibration was validated.

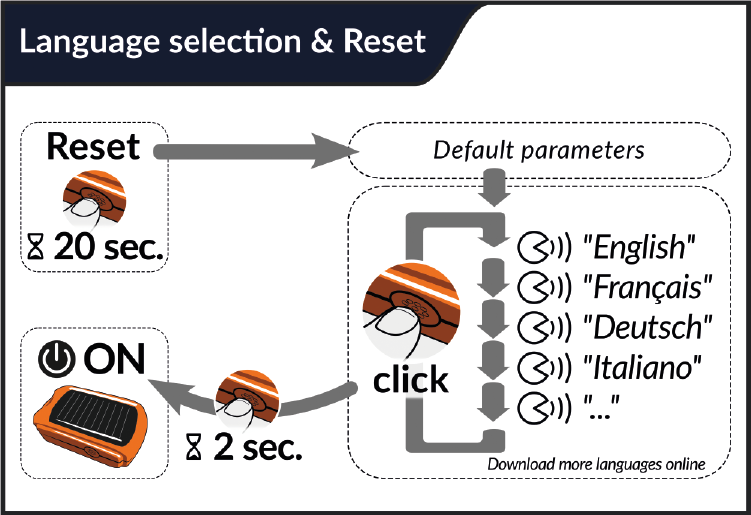
  1. Download the language pack file
  2. Connect leGPSBip+ via USB (see "file transfer and charge" section of the manual) to a computer
  3. Replace the old file with the new one in the folder named "voices".
  4. Leave leGPSBip+ connected until it stops flashing, then click on "Eject".
  5. Disconnect leGPSBip+ and switch it on


There must always be at least one language pack in the "voices" folder.

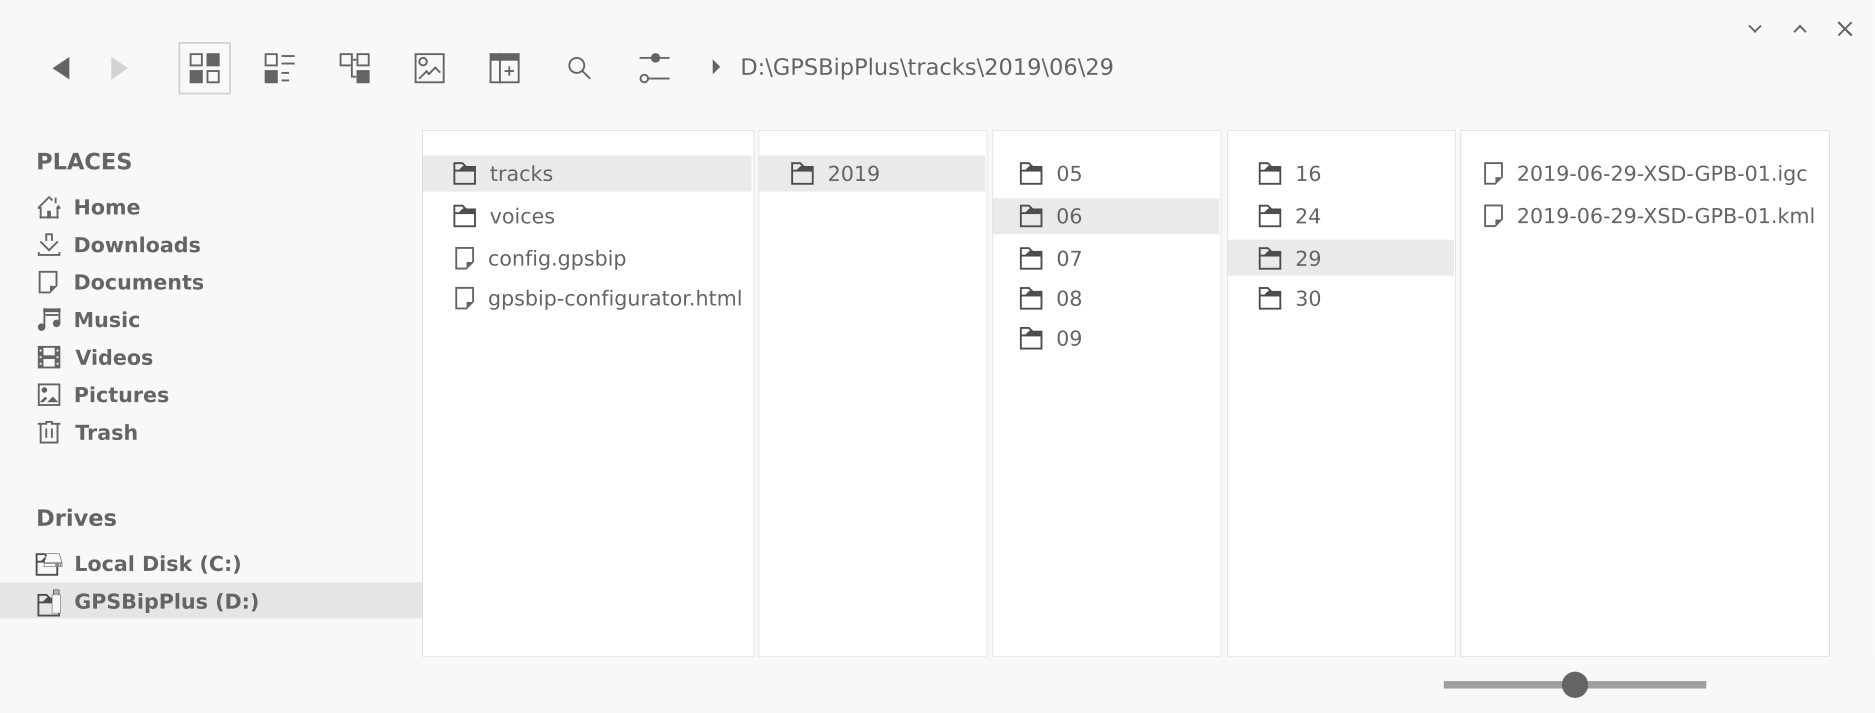
When you plug your GPSBip+ into your computer, it appears as a USB stick in your file explorer.

Its root tree should look like this:

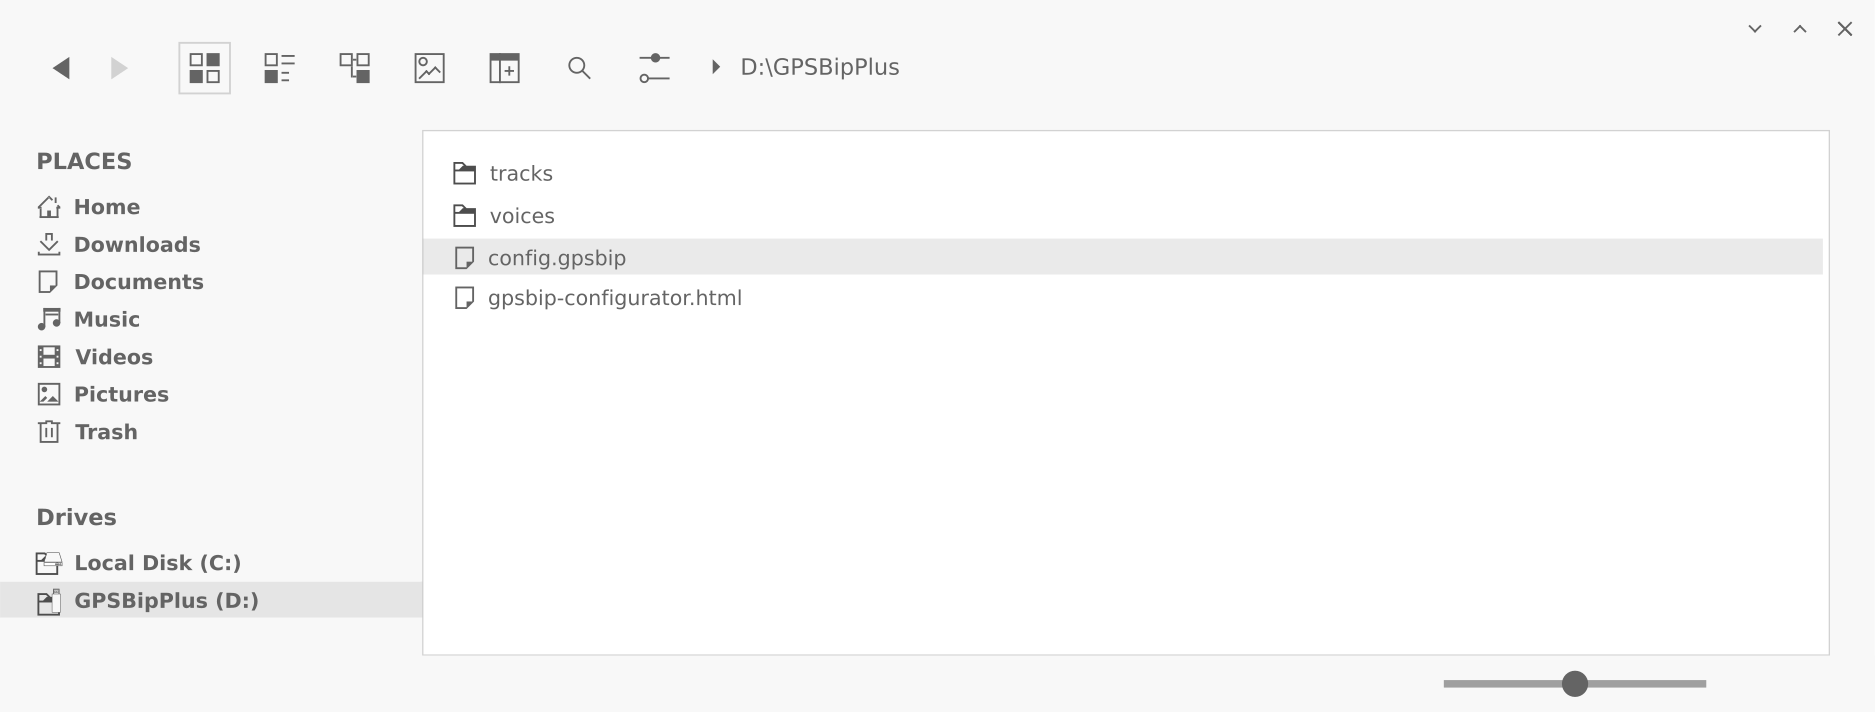
If the "voices" folder or the "gpsbip-configurator.html" file is deleted, the device will no longer function correctly. They must not be renamed either. And under no circumstances should the leGPSBip+ drive be formatted, as this could invalidate the manufacturer's warranty.

Only the "config.gpsbip" file can be deleted, which is equivalent to performing a reset (press the button for 20s).

The "voices" folder must always contain at least one language pack. You can delete language packs that you are not using. If a language pack is placed outside the "voices" folder, it will not work.

The "tracks" folder contains the tracks recorded. They are sorted by date or flat.

Trace files and date folders can be deleted if required.

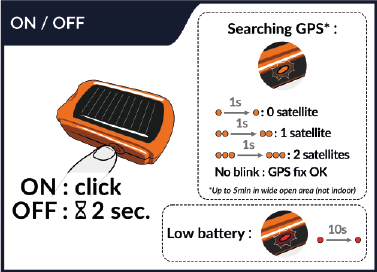
  1. Switching off the appliance
  2. USB connection to a computer
  3. Open the Configurator
  4. Click on "Load config", and follow the instructions
  5. The version number will be visible under System > more (see screenshot below)
Screenshot_firmware_version_number

Vario :

The vario is silent on the ground by default: you must take off to activate the vario (variation of more than 1.5m/s).
(alternatively, changing the volume will also activate this function)

When the battery is very low, the volume is reduced to consume as little energy as possible and enable the GPSBip+ to continue recording the track for as long as possible.

In flight, leGPSBip+ recharges via its solar cell, and when the battery level rises, so does the volume.

It's not a bug, it's a feature: zeroing!

This sound is made up of short modulations indicating weak lift (from -30cm/s to your rate-of-climb setting, by default +20cm/s), not strong enough to roll up, but which will help you find the nearest thermal.

To activate or deactivate it, simply double-click on the button.

  1. When activated in the ConfiguratorleGPSBip+ can announce the average rate of climb. It is integrated over the last 15 seconds before the announcement.

GPS :

It has an internal memory of 8GB, or around 20,000 flights!

Yes, leGPSBip+ can record your track when hiking, cycling or skiing. There's even a special option in the configuration application: it keeps your track firmly on the ground in Google Earth.

Also, leGPSBip+ has been specifically designed for paragliding. It needs good satellite reception, so it can lose satellites when it's under trees in the forest, for example, so there can be gaps in the track.

leGPSBip+ is not waterproof, so we do not recommend using it on board a boat.

In the Configurator, in the "GPS" section, under the "advanced" tab, deactivate the "KML ground track (2D)" option.

(this option is useful for walking and flying routes, for example)

The KML file always records the altitude.
The "KML ground track (2D)" option is for viewing purposes only. If you have a track with this option activated, you can always switch to 3D in Google Earth :

  1. in the left-hand column, right-click on the 'Route' line (3 red dots + flight date)
  2. "Settings" or "info
  3. in the "Altitude" tab, select "Absolute".

The recorded IGC file is FAI-CIVL certified.

Charge :

Yes, any source of any power (from 200mA to 4A) can be used: computer, smartphone charger, cigarette lighter, external battery (of any capacity).

Stodeus instruments have a standard USB connector and can be charged using any cable. You can use any USB charger, standard 5V or Quick Charge (QC), Power Delivery (USB-C PD) as the instruments are fully USB compliant.

Connectivity :

As these devices are becoming rarer on the market, and there are too many hardware differences between production batches, we cannot guarantee connectivity on so many different types of equipment, and we no longer provide support for this feature.

leGPSBip+ can only be connected to Android smartphones and tablets. More information on Connectivity page.

No. The solar cell is powerful enough for leGPSBip+, but not for any other device.